MIL-DTL-16036M(SH)
3.10.8 Bus bar forming. Flat bends for 1/8-inch bus bar shall have an inside radius 1.5 times the thickness of
the bus bar, and the ends of the bus bars shall be neatly finished. Flat bends for bus bar greater than 1/8 inch shall
have an inside radius of no less than the thickness of the bus bar, and the ends of the bus bars shall be neatly
finished. Edgewise bends of copper bars up to 2 inches in width may be made on an inside radius of 1 inch, and
those over 2 inches, but not exceeding 4 inches in width, may be made on an inside radius of 2 inches. Bars shall be
free from cracks or flaws at bends.
3.10.9 Silver surfacing of buses. Silver surfacing of buses and connections shall be electrodeposited Type 1,
Grade A, B, or C silver coatings as specified in ASTM B700. Silver coatings shall conform to the requirements of
ASTM B700 with the exception that the silver plate shall not be less than 0.0002 inch thick. Contact surfaces of bus
bars shall be silvered up to 1 inch past the joint area. The entire bus may be silver-surfaced at the discretion of the
contractor. Threaded surfaces shall have silver thickness of at least 0.0002 inch.
3.10.9.1 Holes in bus bars. Holes in bus bars for bolting may be either punched or drilled, but the contact area
shall be smoothed and burr free before silver surfacing. Where punching is used, the operation shall not appreciably
indent the surface of the bus bar in the vicinity of the hole. Slotted holes are not permitted. Contact surfaces of bus
bars and contact nuts shall be finished true to give adequate contact. Contact nuts and contact spacer nuts for copper
stud contacts shall be of rolled brass and shall be of sufficient size to provide the necessary area for contact surface.
Contact nuts and contact spacer nuts for silvered contacts shall be silver-surfaced, as specified in 3.10.9 for threaded
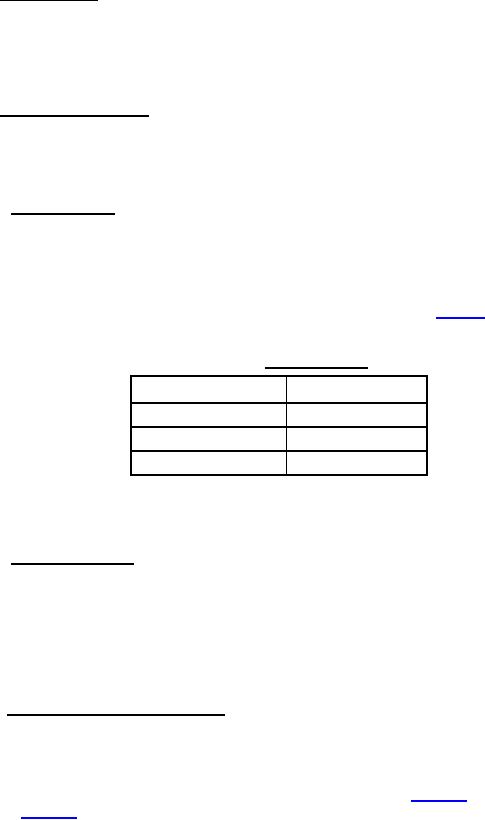
surfaces. Holes in bus bars for standard bolts shall have the dimensions specified in table III.
TABLE III. Bus bar hole size.
Bolt size (inch)
Hole size (inch)
3/8
7/16
1/2
9/16
5/8
11/16
When 5-inch or larger bus bars are joined together, the bolt hole size may be enlarged to provide 1/8-inch
clearance.
3.10.9.2 Preparation of joints. Joints of all bus bars shall be specially prepared before bolting. Method of
preparation shall be as follows:
a. Apply a thin film of corrosion preventive paste, in accordance with MIL-C-11796, to the mating faces of
the joint. Paste may be applied to the hardware. If paste is applied to the hardware, the hardware is to be treated as
lubricated for tightening purposes.
b.
Bolt joints together without removing the paste.
c.
After joints are bolted together, remove paste from all exposed surfaces with a clean, dry cloth.
3.10.10 Bolts and nuts used in bus bar joints. Bolts and nuts used in bus bar joints shall be of the coarse thread
series made of a 300 series corrosion resistant steel (CRES); silicon bronze conforming to ASTM B98/B98M,
ASTM B411/B411M, or ASTM B371/B371M; or zinc plated steel conforming to MIL-DTL-1222 (a minimum of
Grade 2 or 5 depending on stress on the bolts and nuts). Silicon bronze hardware shall be used in bus bar joints
4000 amperes and above. Washers of material similar to the nuts and bolts shall be used under all bolt heads and
nuts adjacent to the conductors. For typical bus joint hardware connections, see figure 15. For typical bus bar
mountings, see figure 16. Locking devices listed in 3.5.12.3 shall be used in bus bar joints for surface ships and for
submarines. Bus bars may be joined by welding; however, welding shall be restricted to assemblies where
disassembly will not be required for maintenance or repair of underlying assemblies. All welders and weld
procedures for copper bus bars shall be qualified in accordance with S9074-AQ-GIB-010/248.
32
For Parts Inquires submit RFQ to Parts Hangar, Inc.
© Copyright 2015 Integrated Publishing, Inc.
A Service Disabled Veteran Owned Small Business